1 基础配置
1.1 配置地址
VMware设置地址范围和网关
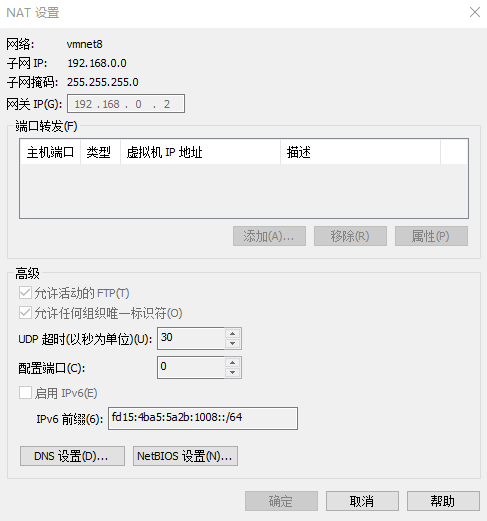
设置服务器IP地址。
编辑网卡:
[root@ai_bk ~]# vi /etc/sysconfig/network-scripts/ifcfg-ens33
[root@ai_bk ~]# vi /etc/sysconfig/network-scripts/ifcfg-ens33
[root@ai_bk ~]# cat /etc/sysconfig/network-scripts/ifcfg-ens33
TYPE=Ethernet
PROXY_METHOD=none
BROWSER_ONLY=no
BOOTPROTO=static
DEFROUTE=yes
IPADDR=192.168.0.100
GATEWAY=192.168.0.2
DNS1=8.8.8.8
IPV4_FAILURE_FATAL=no
IPV6INIT=yes
IPV6_AUTOCONF=yes
IPV6_DEFROUTE=yes
IPV6_FAILURE_FATAL=no
IPV6_ADDR_GEN_MODE=stable-privacy
NAME=ens33
UUID=d8a50863-1cc7-4fab-aee1-f9696525ed80
DEVICE=ens33
ONBOOT=yes
[root@ai_bk ~]#
重新启动网卡:
[root@ai_bk ~]# systemctl restart network
[root@ai_bk ~]# systemctl restart network
[root@ai_bk ~]#
1.1.1 验证
使用SSH连接:
Connecting to 192.168.0.100:22...
Connection established.
To escape to local shell, press 'Ctrl+Alt+]'.

WARNING! The remote SSH server rejected X11 forwarding request.
Last login: Thu Dec 24 09:26:38 2020
1.2 关闭防火墙
查看状态、关闭防火墙、禁止自启动
[root@localhost ~]# firewall-cmd --state
[root@localhost ~]# systemctl stop firewalld
[root@localhost ~]# systemctl disable firewalld
Removed symlink /etc/systemd/system/multi-user.target.wants/firewalld.service.
Removed symlink /etc/systemd/system/dbus-org.fedoraproject.FirewallD1.service.
1.3 禁用SELINUX
将SELINUX修改为disabled
[root@localhost ~]# vi /etc/selinux/config
[root@localhost ~]# vi /etc/selinux/config

[root@localhost ~]# cat /etc/selinux/config
# This file controls the state of SELinux on the system.
# SELINUX= can take one of these three values:
#     enforcing - SELinux security policy is enforced.
#     permissive - SELinux prints warnings instead of enforcing.
#     disabled - No SELinux policy is loaded.
SELINUX=disabled
# SELINUXTYPE= can take one of three two values:
#     targeted - Targeted processes are protected,
#     minimum - Modification of targeted policy. Only selected processes are protected.
#     mls - Multi Level Security protection.
SELINUXTYPE=targeted
1.4 修改HOSTNAME
修改主机名,并查看
[root@localhost ~]# hostnamectl set-hostname ai_bk
[root@localhost ~]# hostname
ai_bk
重启
[root@localhost ~]# reboot
[root@localhost ~]# reboot重启后,已经改动
Connecting to 192.168.0.100:22...
Connection established.
To escape to local shell, press 'Ctrl+Alt+]'.

WARNING! The remote SSH server rejected X11 forwarding request.
Last login: Thu Dec 24 09:28:37 2020 from 192.168.0.1
[root@ai_bk ~]#
2 LAMP环境搭建
2.1 创建日志目录
[root@ai_bk ~]# mkdir -p /var/www/logs
[root@ai_bk ~]# ll /var/www/logs/
total 0
2.2 安装Apache
2.2.1 安装
[root@ai_bk ~]# yum -y install httpd
[root@ai_bk ~]# yum -y install httpd
Loaded plugins: fastestmirror
Determining fastest mirrors
 * base: mirrors.bfsu.edu.cn
 * extras: mirrors.bfsu.edu.cn
 * updates: mirrors.bfsu.edu.cn
base                                                                           ……………………………………………………………………………..

Installed:
  httpd.x86_64 0:2.4.6-97.el7.centos

Dependency Installed:
  apr.x86_64 0:1.4.8-7.el7     apr-util.x86_64 0:1.5.2-6.el7     httpd-tools.x86_64 0:2.4.6-97.el7.centos     mailcap.noarch 0:2.1.41-2.el7

Complete!
[root@ai_bk ~]#
2.2.2 配置
修改配置文件
[root@ai_bk ~]# vi /etc/httpd/conf/httpd.conf
42 Listen 5888
95 ServerName ibc.wisdomct.cn:5888
119 DocumentRoot "/var/www/html"
124 <Directory "/var/www/html">
164 DirectoryIndex index.html login.html
182 ErrorLog "/var/www/logs/error_log"
217 CustomLog "/var/www/logs/access_log" combined
2.2.3 重启、自启动
[root@ai_bk ~]# systemctl restart httpd
[root@ai_bk ~]# systemctl enable httpd
Created symlink from /etc/systemd/system/multi-user.target.wants/httpd.service to /usr/lib/systemd/system/httpd.service.
[root@ai_bk ~]#
2.3 用户
2.3.1 创建用户
[root@ai_bk ~]# useradd -g 48 -u 1024 pyrk2.3.2 修改组属性
修改PYRK属性
[root@ai_bk ~]# vi /etc/passwd
[root@ai_bk ~]# cat /etc/passwd
[root@ai_bk ~]# cat /etc/passwd
root:x:0:0:root:/root:/bin/bash
……………………………………………………………..
sshd:x:74:74:Privilege-separated SSH:/var/empty/sshd:/sbin/nologin
postfix:x:89:89::/var/spool/postfix:/sbin/nologin
apache:x:48:48:Apache:/usr/share/httpd:/sbin/nologin
pyrk:x:48:48::/home/pyrk:/bin/bash
2.3.3 修改用户目录属性
[root@ai_bk ~]# cd /home
[root@ai_bk home]# ll
total 0
drwx------ 2 1024 apache 62 Dec 24 09:50 pyrk
[root@ai_bk home]#

[root@ai_bk home]# chown apache:apache pyrk
[root@ai_bk home]# ll
total 0
drwx------ 2 apache apache 62 Dec 24 09:50 pyrk
[root@ai_bk home]#
2.3.4 修改发布目录属性
[root@ai_bk home]# cd /var/www
[root@ai_bk www]# ll
total 0
drwxr-xr-x 2 root root 6 Nov 16 11:19 cgi-bin
drwxr-xr-x 2 root root 6 Nov 16 11:19 html
drwxr-xr-x 2 root root 6 Dec 24 09:38 logs
修改属性
[root@ai_bk www]# chown apache:apache html
[root@ai_bk www]# chown apache:apache logs

[root@ai_bk www]# ll
total 0
drwxr-xr-x 2 root   root   6 Nov 16 11:19 cgi-bin
drwxr-xr-x 2 apache apache 6 Nov 16 11:19 html
drwxr-xr-x 2 apache apache 6 Dec 24 09:38 logs
2.3.5 设置用户密码
[root@ai_bk www]# passwd pyrk
[root@ai_bk www]# passwd pyrk
Changing password for user pyrk.
New password:
BAD PASSWORD: The password contains the user name in some form
Retype new password:
passwd: all authentication tokens updated successfully.
[root@ai_bk www]#
2.3.6 验证
使用pyrk用户SSH登录
Connecting to 192.168.0.100:22...
Connection established.
To escape to local shell, press 'Ctrl+Alt+]'.

WARNING! The remote SSH server rejected X11 forwarding request.
[apache@ai_bk ~]$
2.4 安装SSL(https访问-可选)
如果WEB访问不需要HTTPS,则可以不用设置。
2.4.1 安装
[root@ai_bk www]# yum -y install openssl openssl-devel mod_ssl
[root@ai_bk www]# yum -y install openssl openssl-devel mod_ssl
Loaded plugins: fastestmirror
Loading mirror speeds from cached hostfile
 * base: mirrors.bfsu.edu.cn
 * extras: mirrors.bfsu.edu.cn
 * updates: mirrors.bfsu.edu.cn
Resolving Dependencies
--> Running transaction check
……………………………………………………………………………….

Dependency Updated:
  e2fsprogs.x86_64 0:1.42.9-19.el7 e2fsprogs-libs.x86_64 0:1.42.9-19.el7 krb5-libs.x86_64 0:1.15.1-50.el7     libcom_err.x86_64 0:1.42.9-19.el7
  libselinux.x86_64 0:2.5-15.el7   libselinux-python.x86_64 0:2.5-15.el7 libselinux-utils.x86_64 0:2.5-15.el7 libsepol.x86_64 0:2.5-10.el7
  libss.x86_64 0:1.42.9-19.el7     openssl-libs.x86_64 1:1.0.2k-21.el7_9 zlib.x86_64 0:1.2.7-18.el7

Complete!
2.4.2 配置
配置文件目录
[root@ai_bk ~]# ll /etc/httpd/conf.d
[root@ai_bk ~]# ll /etc/httpd/conf.d
total 28
-rw-r--r-- 1 root root 2926 Nov 16 11:18 autoindex.conf
-rw-r--r-- 1 root root  366 Nov 16 11:19 README
-rw-r--r-- 1 root root 9443 Nov 16 09:44 ssl.conf
-rw-r--r-- 1 root root 1252 Nov 16 09:44 userdir.conf
-rw-r--r-- 1 root root  824 Nov 16 09:44 welcome.conf
配置,修改配置文件
[root@ai_bk ~]# vi /etc/httpd/conf.d/ssl.conf
    59	DocumentRoot "/var/www/html"
    60	ServerName www.ibc.wisdomct.cn:443
    75	SSLProtocol -all +TLSv1.2
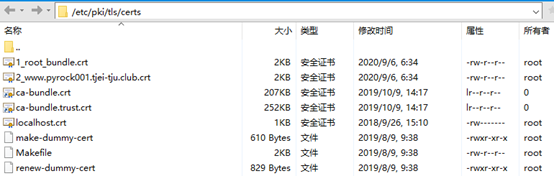
2.4.3 导入文件CA文件
准备文件

由于是LAMP环境,所以使用Apache证书

配置,修改配置文件
[root@ai_bk ~]# vi /etc/httpd/conf.d/ssl.conf
100	SSLCertificateFile /etc/pki/tls/certs/2_www.pyrock001.tjei-tju.club.crt
107	SSLCertificateKeyFile /etc/pki/tls/private/3_www.pyrock001.tjei-tju.club.key
116	#SSLCertificateChainFile /etc/pki/tls/certs/server-chain.crt
122	SSLCACertificateFile /etc/pki/tls/certs/1_root_bundle.crt
将文件拷贝进入对应目录

2.5 安装Mariadb
2.5.1 安装
[root@ai_bk ~]# yum -y install mariadb mariadb-server
[root@ai_bk ~]# yum -y install mariadb mariadb-server
Loaded plugins: fastestmirror
Loading mirror speeds from cached hostfile
 * base: mirrors.bfsu.edu.cn
 * extras: mirrors.bfsu.edu.cn
 * updates: mirrors.bfsu.edu.cn
Resolving Dependencies
--> Running transaction check
---> Package mariadb.x86_64 1:5.5.68-1.el7 will be installed
--> Processing Dependency: mariadb-libs(x86-64) = 1:5.5.68-1.el7 for package:
………………………….
  perl-macros.x86_64 4:5.16.3-297.el7            perl-parent.noarch 1:0.225-244.el7              perl-podlators.noarch 0:2.5.1-3.el7
  perl-threads.x86_64 0:1.87-4.el7               perl-threads-shared.x86_64 0:1.43-6.el7

Dependency Updated:
  mariadb-libs.x86_64 1:5.5.68-1.el7

Complete!
[root@ai_bk ~]#
2.5.2 启动、自启动
[root@ai_bk ~]# systemctl start mariadb
[root@ai_bk ~]# systemctl enable mariadb
[root@ai_bk ~]# systemctl start mariadb
[root@ai_bk ~]# systemctl enable mariadb
Created symlink from /etc/systemd/system/multi-user.target.wants/mariadb.service to /usr/lib/systemd/system/mariadb.service.
[root@ai_bk ~]#
2.5.3 设置root密码
默认root密码为空,需要进行设置
[root@ai_bk ~]# mysql_secure_installation

NOTE: RUNNING ALL PARTS OF THIS SCRIPT IS RECOMMENDED FOR ALL MariaDB
      SERVERS IN PRODUCTION USE!  PLEASE READ EACH STEP CAREFULLY!

In order to log into MariaDB to secure it, we'll need the current
password for the root user.  If you've just installed MariaDB, and
you haven't set the root password yet, the password will be blank,
so you should just press enter here.

Enter current password for root (enter for none):
OK, successfully used password, moving on...

Setting the root password ensures that nobody can log into the MariaDB
root user without the proper authorisation.

Set root password? [Y/n] Y
New password: 输入密码
Re-enter new password: 输入密码
Password updated successfully!
Reloading privilege tables..
 ... Success!


By default, a MariaDB installation has an anonymous user, allowing anyone
to log into MariaDB without having to have a user account created for
them.  This is intended only for testing, and to make the installation
go a bit smoother.  You should remove them before moving into a
production environment.

Remove anonymous users? [Y/n] Y
 ... Success!

Normally, root should only be allowed to connect from 'localhost'.  This
ensures that someone cannot guess at the root password from the network.

Disallow root login remotely? [Y/n] Y
 ... Success!

By default, MariaDB comes with a database named 'test' that anyone can
access.  This is also intended only for testing, and should be removed
before moving into a production environment.

Remove test database and access to it? [Y/n] n
 ... skipping.

Reloading the privilege tables will ensure that all changes made so far
will take effect immediately.

Reload privilege tables now? [Y/n] Y
 ... Success!

Cleaning up...

All done!  If you've completed all of the above steps, your MariaDB
installation should now be secure.

Thanks for using MariaDB!
重启服务
[root@ai_bk ~]# systemctl restart mariadb
[root@ai_bk ~]# systemctl restart mariadb
[root@ai_bk ~]#
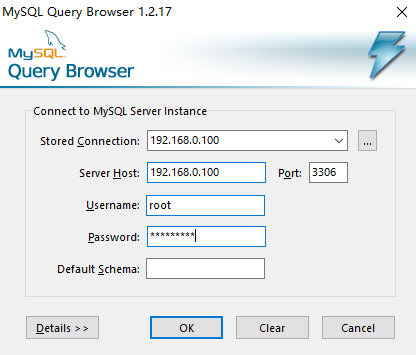
2.5.4 新建用户,允许远程连接
新建用户pyrk,设置允许root远程连接,*******为新用户密码
[root@ai_bk ~]# mysql -uroot -p
[root@ai_bk ~]# mysql -uroot -p
Enter password:
Welcome to the MariaDB monitor.  Commands end with ; or \g.
Your MariaDB connection id is 2
Server version: 5.5.68-MariaDB MariaDB Server

Copyright (c) 2000, 2018, Oracle, MariaDB Corporation Ab and others.

Type 'help;' or '\h' for help. Type '\c' to clear the current input statement.

MariaDB [(none)]> CREATE USER 'pyrk'@'%' IDENTIFIED BY '*******';
Query OK, 0 rows affected (0.00 sec)

MariaDB [(none)]> GRANT ALL PRIVILEGES ON *.* TO 'pyrk'@'%' IDENTIFIED BY '*******' WITH GRANT OPTION;
Query OK, 0 rows affected (0.00 sec)

MariaDB [(none)]> FLUSH PRIVILEGES;
Query OK, 0 rows affected (0.00 sec)

MariaDB [(none)]> exit
Bye
验证

2.5.5 设置root可以远程连接
*******为root密码
[root@ai_bk ~]# mysql -uroot -p
Enter password:
Welcome to the MariaDB monitor.  Commands end with ; or \g.
Your MariaDB connection id is 3
Server version: 5.5.68-MariaDB MariaDB Server

Copyright (c) 2000, 2018, Oracle, MariaDB Corporation Ab and others.

Type 'help;' or '\h' for help. Type '\c' to clear the current input statement.

MariaDB [(none)]> grant all privileges on *.* to 'root'@'%' identified by '********' with grant option;
Query OK, 0 rows affected (0.00 sec)

MariaDB [(none)]> flush privileges;
Query OK, 0 rows affected (0.00 sec)

MariaDB [(none)]> exit
Bye
验证
2.5.6 设置编码格式
2.5.6.1 查看现有编码格式
[root@ai_bk ~]# mysql -uroot -p
[root@ai_bk ~]# mysql -uroot -p
Enter password:
ERROR 1045 (28000): Access denied for user 'root'@'localhost' (using password: YES)
[root@ai_bk ~]# mysql -uroot -p
Enter password:
Welcome to the MariaDB monitor.  Commands end with ; or \g.
Your MariaDB connection id is 15
Server version: 5.5.68-MariaDB MariaDB Server

Copyright (c) 2000, 2018, Oracle, MariaDB Corporation Ab and others.

Type 'help;' or '\h' for help. Type '\c' to clear the current input statement.

MariaDB [(none)]> show variables like 'character%';
+--------------------------+----------------------------+
| Variable_name            | Value                      |
+--------------------------+----------------------------+
| character_set_client     | utf8                       |
| character_set_connection | utf8                       |
| character_set_database   | latin1                     |
| character_set_filesystem | binary                     |
| character_set_results    | utf8                       |
| character_set_server     | latin1                     |
| character_set_system     | utf8                       |
| character_sets_dir       | /usr/share/mysql/charsets/ |
+--------------------------+----------------------------+
8 rows in set (0.00 sec)

MariaDB [(none)]> exit
Bye
2.5.6.2 设置/etc/my.cnf
[root@ai_bk ~]# vi /etc/my.cnf
[root@ai_bk ~]# cat /etc/my.cnf
[root@ai_bk ~]# cat /etc/my.cnf
[client]
default-character-set=utf8

[mysql]
default-character-set=utf8

[mysqld]
datadir=/var/lib/mysql
socket=/var/lib/mysql/mysql.sock
# Disabling symbolic-links is recommended to prevent assorted security risks
symbolic-links=0
# Settings user and group are ignored when systemd is used.
# If you need to run mysqld under a different user or group,
# customize your systemd unit file for mariadb according to the
# instructions in http://fedoraproject.org/wiki/Systemd
init_connect='SET collation_connection = utf8_unicode_ci'
init_connect='SET NAMES utf8'
character-set-server=utf8
collation-server=utf8_unicode_ci
skip-character-set-client-handshake

max_heap_table_size = 128M
tmp_table_size = 128M

max_allowed_packet=16M
max_connections=1024

thread_cache_size=256
sort_buffer_size=8M
bulk_insert_buffer_size = 16M

innodb_buffer_pool_size = 256M
innodb_log_buffer_size  = 8M


[mysqld_safe]
log-error=/var/log/mariadb/mariadb.log
pid-file=/var/run/mariadb/mariadb.pid

#
# include all files from the config directory
#
!includedir /etc/my.cnf.d
[root@ai_bk ~]#
容器中,需要把权限设置为644
重启
[root@ai_bk ~]# systemctl restart mariadb
[root@ai_bk ~]# systemctl restart mariadb
[root@ai_bk ~]#
2.5.6.3 验证
[root@ai_bk ~]# mysql -uroot -p
[root@ai_bk ~]# mysql -uroot -p
Enter password:
Welcome to the MariaDB monitor.  Commands end with ; or \g.
Your MariaDB connection id is 237
Server version: 5.5.68-MariaDB MariaDB Server

Copyright (c) 2000, 2018, Oracle, MariaDB Corporation Ab and others.

Type 'help;' or '\h' for help. Type '\c' to clear the current input statement.

MariaDB [(none)]> show variables like 'character%';
+--------------------------+----------------------------+
| Variable_name            | Value                      |
+--------------------------+----------------------------+
| character_set_client     | utf8                       |
| character_set_connection | utf8                       |
| character_set_database   | utf8                       |
| character_set_filesystem | binary                     |
| character_set_results    | utf8                       |
| character_set_server     | utf8                       |
| character_set_system     | utf8                       |
| character_sets_dir       | /usr/share/mysql/charsets/ |
+--------------------------+----------------------------+
8 rows in set (0.00 sec)

MariaDB [(none)]> exit
Bye
[root@ai_bk ~]#
2.5.7 设置最大连接数
2.5.7.1 查看
centos7使用mariadb数据库时,有个默认最大连接数。
[root@ai_bk ~]# mysql -uroot -p
Enter password:
Welcome to the MariaDB monitor.  Commands end with ; or \g.
Your MariaDB connection id is 4
Server version: 5.5.68-MariaDB MariaDB Server

Copyright (c) 2000, 2018, Oracle, MariaDB Corporation Ab and others.

Type 'help;' or '\h' for help. Type '\c' to clear the current input statement.

MariaDB [(none)]> show variables like 'max_connections';
+-----------------+-------+
| Variable_name   | Value |
+-----------------+-------+
| max_connections | 151   |
+-----------------+-------+
1 row in set (0.00 sec)

MariaDB [(none)]> exit
Bye
[root@ai_bk ~]#
2.5.7.2 修改
仅仅修改配置文件/etc/my.cnf中的max_connections=1024是不起作用的,还需要修改vi /usr/lib/systemd/system/mariadb.service,[Service]前面的#号,并添加:
[root@ai_bk ~]# vi /usr/lib/systemd/system/mariadb.service
[root@ai_bk ~]# cat /usr/lib/systemd/system/mariadb.service
[root@ai_bk ~]# cat /usr/lib/systemd/system/mariadb.service
……
[Service]
LimitNOFILE=10000
LimitNPROC=10000
……
[Service]
Type=simple
User=mysql
Group=mysql
……
重新加载系统服务,并重启mariadb
[root@ai_bk ~]# systemctl daemon-reload
[root@ai_bk ~]# systemctl restart mariadb
[root@ai_bk ~]#
2.5.7.3 确认
[root@ai_bk ~]# mysql -uroot -p
[root@ai_bk ~]# mysql -uroot -p
Enter password:
Welcome to the MariaDB monitor.  Commands end with ; or \g.
Your MariaDB connection id is 2
Server version: 5.5.68-MariaDB MariaDB Server

Copyright (c) 2000, 2018, Oracle, MariaDB Corporation Ab and others.

Type 'help;' or '\h' for help. Type '\c' to clear the current input statement.

MariaDB [(none)]> show variables like 'max_connections';
+-----------------+-------+
| Variable_name   | Value |
+-----------------+-------+
| max_connections | 1024  |
+-----------------+-------+
1 row in set (0.00 sec)

MariaDB [(none)]> exit
Bye
[root@ai_bk ~]#
2.5.8 导出导入
2.5.8.1 导出
导出已有系统数据库表
[apache@ai_bk www]$ mysqldump -uroot -p -d ai_bk>ai_bk_20201224.sql
[apache@ai_bk www]$ mysqldump -uroot -p -d ai_bk>ai_bk_20201224.sql
Enter password:

[apache@ai_bk www]$ ll
total 39060
-rw-r--r-- 1 apache apache    14742 Dec 24 11:25 ai_bk_20201224.sql
……………………………………………..
[apache@ai_bk www]$
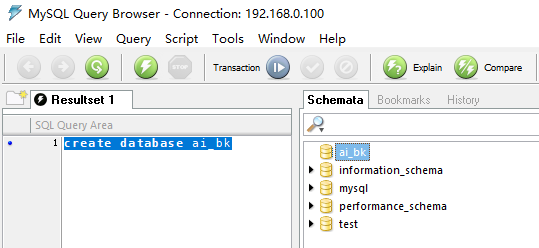
2.5.8.2 建库
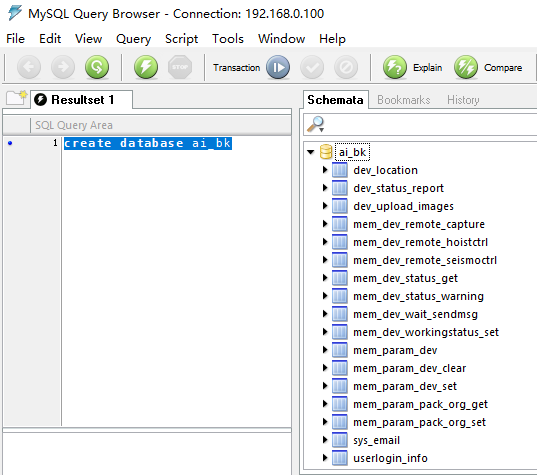
先创建数据库ai_bk;create database ai_bk
2.5.8.3 导入
导入数据库表格式
[root@ai_bk ~]# mysql -uroot -p
Enter password:
Welcome to the MariaDB monitor.  Commands end with ; or \g.
Your MariaDB connection id is 7
Server version: 5.5.68-MariaDB MariaDB Server

Copyright (c) 2000, 2018, Oracle, MariaDB Corporation Ab and others.

Type 'help;' or '\h' for help. Type '\c' to clear the current input statement.

MariaDB [(none)]> use ai_bk;
Database changed
MariaDB [ai_bk]> source /var/www/ai_bk_20201224.sql
Query OK, 0 rows affected (0.00 sec)

Query OK, 0 rows affected (0.00 sec)

Query OK, 0 rows affected (0.00 sec)
…………………………………………….

Query OK, 0 rows affected (0.00 sec)

MariaDB [ai_bk]>
2.5.8.4 验证
2.5.8.5 数据库初始化
插入登录默认用户,便于WEB登录
insert into ai_bk.userlogin_info values (1,'admin','c4ca4238a0b923820dcc509a6f75849b')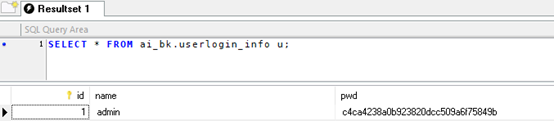
2.6 安装PHP
2.6.1 准备环境
[root@ai_bk ~]# rpm -Uvh https://dl.fedoraproject.org/pub/epel/epel-release-latest-7.noarch.rpm
[root@ai_bk ~]# rpm -Uvh https://mirror.webtatic.com/yum/el7/webtatic-release.rpm
[root@ai_bk ~]# rpm -Uvh https://dl.fedoraproject.org/pub/epel/epel-release-latest-7.noarch.rpm
Retrieving https://dl.fedoraproject.org/pub/epel/epel-release-latest-7.noarch.rpm
warning: /var/tmp/rpm-tmp.jfjrf6: Header V4 RSA/SHA256 Signature, key ID 352c64e5: NOKEY
Preparing...                          ################################# [100%]
Updating / installing...
   1:epel-release-7-13                ################################# [100%]
[root@ai_bk ~]# rpm -Uvh https://mirror.webtatic.com/yum/el7/webtatic-release.rpm
Retrieving https://mirror.webtatic.com/yum/el7/webtatic-release.rpm
warning: /var/tmp/rpm-tmp.o9SICS: Header V4 RSA/SHA1 Signature, key ID 62e74ca5: NOKEY
Preparing...                          ################################# [100%]
Updating / installing...
   1:webtatic-release-7-3             ################################# [100%]
2.6.2 安装
查找php7的版本
[root@ai_bk ~]# yum search php7
[root@ai_bk ~]# yum search php7
Loaded plugins: fastestmirror
Loading mirror speeds from cached hostfile
epel/x86_64/metalink                                                                                                     | 6.5 kB  00:00:00
 * base: mirrors.bfsu.edu.cn
………………………………………………………
php71w-pecl-geoip.x86_64 : Extension to map IP addresses to geographic places
php71w-pecl-igbinary.x86_64 : Replacement for the standard PHP serializer
php71w-pecl-igbinary-devel.x86_64 : Igbinary developer files (header)
php71w-pecl-imagick.x86_64 : Provides a wrapper to the ImageMagick library
php71w-pecl-imagick-devel.x86_64 : Imagick developer files (header)
php71w-pecl-memcached.x86_64 : Extension to work with the Memcached caching daemon
php71w-pecl-mongodb.x86_64 : PECL package MongoDB driver
php71w-pecl-redis.x86_64 : Extension for communicating with the Redis key-value store
……………………………………………………………….
php72w-snmp.x86_64 : A module for PHP applications that query SNMP-managed devices
php72w-soap.x86_64 : A module for PHP applications that use the SOAP protocol
php72w-sodium.x86_64 : Wrapper for the Sodium cryptographic library
php72w-tidy.x86_64 : Standard PHP module provides tidy library support
php72w-xml.x86_64 : A module for PHP applications which use XML
php72w-xmlrpc.x86_64 : A module for PHP applications which use the XML-RPC protocol

  Name and summary matches only, use "search all" for everything.
[root@ai_bk ~]#
安装php71版本
[root@ai_bk ~]# yum -y install php71w php71w-cli php71w-common php71w-devel php71w-embedded php71w-fpm php71w-gd php71w-mbstring php71w-mysqlnd php71w-opcache php71w-pdo php71w-xml
[root@ai_bk ~]# yum -y install php71w php71w-cli php71w-common php71w-devel php71w-embedded php71w-fpm php71w-gd php71w-mbstring php71w-mysqlnd php71w-opcache php71w-pdo php71w-xml
Loaded plugins: fastestmirror
Loading mirror speeds from cached hostfile
 * base: mirrors.bfsu.edu.cn
 * epel: mirrors.tuna.tsinghua.edu.cn
 * extras: mirrors.bfsu.edu.cn
 * updates: mirrors.bfsu.edu.cn
 * webtatic: us-east.repo.webtatic.com
Resolving Dependencies
--> Running transaction check
………………………………………………
  libXau.x86_64 0:1.0.8-2.1.el7  libXpm.x86_64 0:3.5.12-1.el7    libjpeg-turbo.x86_64 0:1.2.90-8.el7    libpng.x86_64 2:1.5.13-8.el7
  libxcb.x86_64 0:1.13-1.el7     m4.x86_64 0:1.4.16-10.el7       perl-Test-Harness.noarch 0:3.28-3.el7  perl-Thread-Queue.noarch 0:3.02-2.el7

Complete!
[root@ai_bk ~]#
多进程需要
[root@ai_bk ~]# yum -y install php71w-posix
Loaded plugins: fastestmirror
Loading mirror speeds from cached hostfile
 * base: mirrors.bfsu.edu.cn
 * epel: mirrors.tuna.tsinghua.edu.cn
 * extras: mirrors.bfsu.edu.cn
……………………………………………………..
Running transaction
  Installing : php71w-process-7.1.33-1.w7.x86_64                                                                                            1/1
  Verifying  : php71w-process-7.1.33-1.w7.x86_64                                                                                            1/1

Installed:
  php71w-process.x86_64 0:7.1.33-1.w7

Complete!
[root@ai_bk ~]#
2.6.3 配置
修改配置文件
[root@ai_bk ~]# vi /etc/php.ini
389 memory_limit = 512M
568 error_log = /var/www/logs/php_errors.log
703	post_max_size = 32M
799 upload_max_filesize = 32M
877 date.timezone = Asia/Shanghai
2.6.4 Apache支持
在Apache中支持PHP,可以运行PHP文件
[root@ai_bk ~]# vi /etc/httpd/conf/httpd.conf
找到:
283     AddType application/x-compress .Z
284     AddType application/x-gzip .gz .tgz
后添加如下内容
286     AddType application/x-httpd-php-source .phps
287     AddType application/x-httpd-php .php
2.6.5 重启
[root@ai_bk ~]# systemctl restart mariadb
[root@ai_bk ~]# systemctl restart httpd
2.6.6 验证
[root@ai_bk ~]# php -v
[root@ai_bk ~]# php -v
PHP 7.1.33 (cli) (built: Oct 26 2019 10:16:23) ( NTS )
Copyright (c) 1997-2018 The PHP Group
Zend Engine v3.1.0, Copyright (c) 1998-2018 Zend Technologies
    with Zend OPcache v7.1.33, Copyright (c) 1999-2018, by Zend Technologies
[root@ai_bk ~]#
3 EMQX
3.1 准备
https://www.emqx.com/zh/try?product=broker
将EMQX软件上传,此处选的是V3.2.3版本
[root@ai_bk ~]# cd /var/www/
[root@ai_bk www]# ll
total 20024
-rw-r--r-- 1 root   root      14742 Dec 24 11:26 ai_bk_20201224.sql
drwxr-xr-x 2 root   root          6 Nov 16 11:19 cgi-bin
-rw-r--r-- 1 root   root   20487388 Dec 24 16:16 emqx-centos7-v3.2.3.x86_64.rpm
drwxr-xr-x 2 apache apache        6 Nov 16 11:19 html
drwxr-xr-x 2 apache apache       41 Dec 24 16:10 logs
3.2 安装
安装上传的文件
[root@ai_bk www]# rpm -ivh emqx-centos7-v3.2.3.x86_64.rpm
[root@ai_bk www]# rpm -ivh emqx-centos7-v3.2.3.x86_64.rpm
Preparing...                          ################################# [100%]
Updating / installing...
   1:emqx-3.2.3-1.el7                 ################################# [100%]
Created symlink from /etc/systemd/system/multi-user.target.wants/emqx.service to /usr/lib/systemd/system/emqx.service.
[root@ai_bk www]#
3.3 启动、自启动
设置启动和自启动
[root@ai_bk www]# systemctl start emqx
[root@ai_bk www]# systemctl enable emqx
[root@ai_bk www]#
3.4 验证
访问EMQX的DASHBOARD,
用默认用户名admin和密码public登录

3.5 配置
3.5.1 单机
修改配置文件,注意此处node.name不需要修改为本地IP,使用127就行
[root@ai_bk emqx]# vi /etc/emqx/emqx.conf
    177 node.name = emqx@127.0.0.1
    452 allow_anonymous = false
    508 mqtt.max_packet_size = 1KB
    891 listener.tcp.external.acceptors = 512
   1133 listener.ssl.external.acceptors = 512
3.5.2 集群
如有三台192.168.0.160,192.168.0.161,192.168.0.162
注意node.name各个节点填写自己的IP地址就行,其他一样
[root@ai_bk emqx]# vi /etc/emqx/emqx.conf
    25	 cluster.discovery = static
    51	 cluster.static.seeds = emqx@62.234.188.57,emqx@62.234.192.50
   177	 node.name = emq@192.168.0.160
   452	 allow_anonymous = false
   891	 listener.tcp.external.acceptors = 1024
  1133	 listener.ssl.external.acceptors = 1024
3.5.2.1 同步
在192.168.0.160节点:
scp $HOME/.erlang.cookie root@192.168.0.161:$HOME/.erlang.cookie
scp $HOME/.erlang.cookie root@192.168.0.162:$HOME/.erlang.cookie
3.5.2.2 查看状态
查看节点状态:emqttd_ctl status
重启三台EMQ服务器
查看集群状态:emqttd_ctl cluster status
页面查看:http://192.168.0.160:18083/#/
3.6 SSL支持
生成CA文件

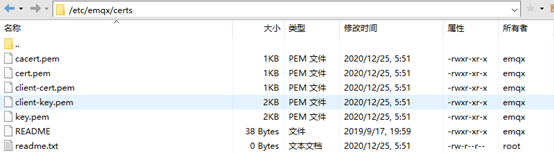
将key.pem、cacert.pem、cert.pem文件拷贝到/etc/emqx/certs/目录,
3.6.1 单机
修改配置文件
[root@ai_bk emqx]# vi /etc/emqx/emqx.conf
   1203 listener.ssl.external.keyfile = /etc/emqx/certs/key.pem
   1210 listener.ssl.external.certfile = /etc/emqx/certs/cert.pem
   1216 listener.ssl.external.cacertfile = /etc/emqx/certs/cacert.pem
3.6.2 集群
依次修改所有主机配置文件
[root@ai_bk emqx]# vi /etc/emqx/emqx.conf
   1203 listener.ssl.external.keyfile = /etc/emqx/certs/key.pem
   1210 listener.ssl.external.certfile = /etc/emqx/certs/cert.pem
   1216 listener.ssl.external.cacertfile = /etc/emqx/certs/cacert.pem
   1686	listener.wss.external.cacertfile = /etc/emqx/certs/cacert.pem
3.7 用户认证
3.7.1 关闭匿名访问
修改配置文件,关闭匿名访问
[root@ai_bk emqx]# vi /data/emqx/etc/emqx.conf,
452 allow_anonymous = false3.7.2 开启认证插件
开启认证插件,这样用户远程连接时,就需要带上用户名和密码。
[root@ai_bk emqx]# emqx_ctl plugins load emqx_auth_username
[root@ai_bk emqx]# emqx_ctl plugins load emqx_auth_username
Start apps: [emqx_auth_username]
Plugin emqx_auth_username loaded successfully.
[root@ai_bk emqx]# emqx_ctl plugins list |grep true
[root@ai_bk emqx]# emqx_ctl plugins list |grep true
Plugin(emqx_auth_username, version=3.2.3, description=EMQ X Authentication with Username and Password, active=true)
Plugin(emqx_dashboard, version=3.2.3, description=EMQ X Web Dashboard, active=true)
Plugin(emqx_management, version=3.2.3, description=EMQ X Management API and CLI, active=true)
Plugin(emqx_recon, version=3.2.3, description=EMQ X Recon Plugin, active=true)
Plugin(emqx_retainer, version=3.2.3, description=EMQ X Retainer, active=true)
Plugin(emqx_rule_engine, version=3.2.3, description=EMQ X Rule Engine, active=true)
3.7.3 添加认证用户
添加用户名和密码,用于远程连接,********为密码
[root@ai_bk emqx]# emqx_ctl users add pyrk ********
ok
[root@ai_bk emqx]# emqx_ctl users list
pyrk
[root@ai_bk emqx]#
4 CKAFKA(可选)
4.1 安装编译环境
[root@ai_bk init.d]# yum -y install gcc
[root@ai_bk init.d]# yum -y install gcc
Loaded plugins: fastestmirror
Loading mirror speeds from cached hostfile
 * base: mirrors.bfsu.edu.cn
 * epel: ftp.iij.ad.jp
 * extras: mirrors.bfsu.edu.cn
 * updates: mirrors.bfsu.edu.cn
 * webtatic: us-east.repo.webtatic.com
Resolving Dependencies
…………………………………..

Dependency Updated:
  glibc.x86_64 0:2.17-317.el7      glibc-common.x86_64 0:2.17-317.el7      libgcc.x86_64 0:4.8.5-44.el7      libgomp.x86_64 0:4.8.5-44.el7

Complete!
[root@ai_bk init.d]# yum -y install gcc-c++
[root@ai_bk init.d]# yum -y install gcc-c++
Loaded plugins: fastestmirror
Loading mirror speeds from cached hostfile
 * base: mirrors.bfsu.edu.cn
 * epel: mirrors.tuna.tsinghua.edu.cn
 * extras: mirrors.bfsu.edu.cn
 * updates: mirrors.bfsu.edu.cn
 * webtatic: us-east.repo.webtatic.com
Resolving Dependencies
………………………………………………….

Dependency Updated:
  libstdc++.x86_64 0:4.8.5-44.el7

Complete!
[root@ai_bk init.d]#
[root@ai_bk www]# yum install -y unzip zip
[root@ai_bk www]# yum install -y unzip zip
Loaded plugins: fastestmirror
Loading mirror speeds from cached hostfile
 * base: mirrors.bfsu.edu.cn
 * epel: mirrors.tuna.tsinghua.edu.cn
 * extras: mirrors.bfsu.edu.cn
 * updates: mirrors.bfsu.edu.cn
 * webtatic: us-east.repo.webtatic.com
Resolving Dependencies
……………………………………………………………

Installed:
  unzip.x86_64 0:6.0-21.el7                                               zip.x86_64 0:3.0-11.el7

Complete!
[root@ai_bk www]#
4.2 安装
上传文件librdkafka-master.zip和php-rdkafka-master.zip至/var/www目录
[root@ai_bk www]# ll /var/www
total 23052
……………………………………………….
-rw-r--r--  1 root   root    3012324 Dec 24 04:24 librdkafka-master.zip
-rw-r--r--  1 root   root      76177 Dec 24 04:29 php-rdkafka-master.zip
4.2.1 安装librdkafka-master
4.2.1.1 解压缩
[root@ai_bk www]# unzip librdkafka-master.zip
[root@ai_bk www]# unzip librdkafka-master.zip
Archive:  librdkafka-master.zip
bf38165a91d4d96aaed39691e48ee190a33a4ffb
   creating: librdkafka-master/
  inflating: librdkafka-master/.appveyor.yml
  inflating: librdkafka-master/.dir-locals.el
  inflating: librdkafka-master/.doozer.json
  ………………………………………………
[root@ai_bk www]# ll

total 22976

-rw-r--r--  1 root   root      14742 Dec 24  2020 ai_bk_20201224.sql

drwxr-xr-x  2 root   root          6 Nov 16 11:19 cgi-bin

-rw-r--r--  1 root   root   20487388 Dec 24  2020 emqx-centos7-v3.2.3.x86_64.rpm

drwxr-xr-x  7 apache apache     4096 Dec 24  2020 html

drwxr-xr-x 11 root   root       4096 Dec  5  2019 librdkafka-master

-rw-r--r--  1 root   root    3012324 Dec 24 04:24 librdkafka-master.zip

drwxr-xr-x  2 apache apache      123 Dec 24 04:21 logs
进入目录
[root@ai_bk www]# cd librdkafka-master
[root@ai_bk www]# cd librdkafka-master
[root@ai_bk librdkafka-master]# ll
total 424
-rw-r--r--  1 root root   6344 Dec  5  2019 CMakeLists.txt
-rw-r--r--  1 root root   3216 Dec  5  2019 CODE_OF_CONDUCT.md
-rw-r--r--  1 root root  45281 Dec  5  2019 CONFIGURATION.md
-rwxr-xr-x  1 root root   4640 Dec  5  2019 configure
-rw-r--r--  1 root root   9495 Dec  5  2019 configure.self
-rw-r--r--  1 root root   8008 Dec  5  2019 CONTRIBUTING.md
drwxr-xr-x  3 root root    311 Dec  5  2019 debian
…………………………………
4.2.1.2 生成Makefile
[root@ai_bk librdkafka-master]# ./configure
[root@ai_bk librdkafka-master]# ./configure
checking for OS or distribution... ok (centos)
checking for C compiler from CC env... failed
checking for gcc (by command)... ok
checking for C++ compiler from CXX env... failed
checking for C++ compiler (g++)... ok
checking executable ld... ok
checking executable nm... ok
checking executable objdump... ok
checking executable strip... ok
checking for pkgconfig (by command)... ok
checking for install (by command)... ok
………………………………..

Now type 'make' to build
[root@ai_bk librdkafka-master]#
4.2.1.3 编译、安装
[root@ai_bk librdkafka-master]# make && make install
[root@ai_bk librdkafka-master]# make && make install
make[1]: Entering directory `/var/www/librdkafka-master/src'
gcc -MD -MP -g -O2 -fPIC -Wall -Wsign-compare -Wfloat-equal -Wpointer-arith -Wcast-align  -c rdkafka.c -o rdkafka.o
gcc -MD -MP -g -O2 -fPIC -Wall -Wsign-compare -Wfloat-equal -Wpointer-arith -Wcast-align  -c rdkafka_broker.c -o rdkafka_broker.o
gcc -MD -MP -g -O2 -fPIC -Wall -Wsign-compare -Wfloat-equal -Wpointer-arith -Wcast-align  -c
…………………………………….
4.2.2 安装php-rdkafka-master.
4.2.2.1 解压缩
[root@ai_bk www]# unzip php-rdkafka-master.zip
[root@ai_bk www]# unzip php-rdkafka-master.zip
Archive:  php-rdkafka-master.zip
c34e221b8b91018faf29125bed3711d163790a00
   creating: php-rdkafka-master/
  inflating: php-rdkafka-master/.editorconfig
   creating: php-rdkafka-master/.github/
  inflating: php-rdkafka-master/.github/ISSUE_TEMPLATE
…………………………………………………..
  inflating: php-rdkafka-master/zeval.h
[root@ai_bk www]#


[root@ai_bk www]# ll
total 23056
-rw-r--r--  1 root   root      14742 Dec 24  2020 ai_bk_20201224.sql
drwxr-xr-x  2 root   root          6 Nov 16 11:19 cgi-bin
-rw-r--r--  1 root   root   20487388 Dec 24  2020 emqx-centos7-v3.2.3.x86_64.rpm
drwxr-xr-x  7 apache apache     4096 Dec 24  2020 html
drwxr-xr-x 11 root   root       4096 Dec 24 04:29 librdkafka-master
-rw-r--r--  1 root   root    3012324 Dec 24 04:24 librdkafka-master.zip
drwxr-xr-x  2 apache apache      123 Dec 24 04:21 logs
drwxr-xr-x  6 root   root       4096 Dec  5  2019 php-rdkafka-master
-rw-r--r--  1 root   root      76177 Dec 24 04:29 php-rdkafka-master.zip


[root@ai_bk www]# cd php-rdkafka-master
[root@ai_bk php-rdkafka-master]# ll
total 308
-rw-r--r-- 1 root root  1546 Dec  5  2019 compat.c
-rw-r--r-- 1 root root  1683 Dec  5  2019 compat.h
-rw-r--r-- 1 root root 25492 Dec  5  2019 conf.c
-rw-r--r-- 1 root root  2639 Dec  5  2019 conf.h
…………………………………………………
-rw-r--r-- 1 root root  1682 Dec  5  2019 zeval.h
4.2.2.2 生成Makefile
检查并生成configure文件
[root@ai_bk php-rdkafka-master]# phpize
[root@ai_bk php-rdkafka-master]# phpize
Configuring for:
PHP Api Version:         20160303
Zend Module Api No:      20160303
Zend Extension Api No:   320160303
[root@ai_bk php-rdkafka-master]#
[root@ai_bk php-rdkafka-master]# ./configure –with-php-config=/usr/bin/php-config
[root@ai_bk php-rdkafka-master]# ./configure --with-php-config=/usr/bin/php-config
checking for grep that handles long lines and -e... /usr/bin/grep
checking for egrep... /usr/bin/grep -E
checking for a sed that does not truncate output... /usr/bin/sed
checking for cc... cc
checking whether the C compiler works... yes
checking for C compiler default output file name... a.out
checking for suffix of executables...
checking whether we are cross compiling... no
…………………………………………………..
config.status: executing libtool commands
[root@ai_bk php-rdkafka-master]#
4.2.2.3 编译、安装
[root@ai_bk php-rdkafka-master]# make && make install
[root@ai_bk php-rdkafka-master]# make && make install
/bin/sh /var/www/php-rdkafka-master/libtool --mode=compile cc  -I. -I/var/www/php-rdkafka-master -DPHP_ATOM_INC -I/var/www/php-rdkafka-master/include -I/var/www/php-rdkafka-master/main -I/var/www/php-rdkafka-master -I/usr/include/php -I/usr/include/php/main -I/usr/include/php/TSRM -I/usr/include/php/Zend -I/usr/include/php/ext -I/usr/include/php/ext/date/lib -I/usr/local/include  -DHAVE_CONFIG_H  -g -O2   -c /var/www/php-rdkafka-master/rdkafka.c -o rdkafka.lo
libtool: compile:  cc -I. -I/var/www/php-rdkafka-master -DPHP_ATOM_INC -I/var/www/php-rdkafka-master/include -I/var/www/php-rdkafka-master/main
…………..
4.3 配置
查找so文件位置
[root@ai_bk php-rdkafka-master]# find / -name rdkafka.so
[root@ai_bk php-rdkafka-master]# find / -name rdkafka.so
/var/www/php-rdkafka-master/modules/rdkafka.so
/var/www/php-rdkafka-master/.libs/rdkafka.so
/usr/lib64/php/modules/rdkafka.so
编辑文件,添加
[root@ai_bk php-rdkafka-master]# vi /etc/php.ini
添加
858 extension=/usr/lib64/php/modules/rdkafka.so重启
[root@ai_bk php-rdkafka-master]# systemctl restart php-fpm
[root@ai_bk php-rdkafka-master]#
5 Swoole(可选)
5.1 下载
[root@ai_bk www]# yum -y install wget
[root@ai_bk www]# yum -y install wget
Loaded plugins: fastestmirror
Loading mirror speeds from cached hostfile
 * base: mirrors.bfsu.edu.cn
 * epel: ftp.iij.ad.jp
 * extras: mirrors.bfsu.edu.cn
 * updates: mirrors.bfsu.edu.cn
 * webtatic: us-east.repo.webtatic.com
Resolving Dependencies
…………………………………………………
  Installing : wget-1.14-18.el7_6.1.x86_64                                                                                                  1/1
  Verifying  : wget-1.14-18.el7_6.1.x86_64                                                                                                  1/1

Installed:
  wget.x86_64 0:1.14-18.el7_6.1

Complete!
[root@ai_bk www]#
下载软件
[root@ai_bk www]# wget https://github.com/swoole/swoole-src/archive/v2.0.6.tar.gz
[root@ai_bk www]# wget https://github.com/swoole/swoole-src/archive/v2.0.6.tar.gz
--2020-12-24 04:36:49--  https://github.com/swoole/swoole-src/archive/v2.0.6.tar.gz
Resolving github.com (github.com)... 13.250.177.223
Connecting to github.com (github.com)|13.250.177.223|:443... connected.
HTTP request sent, awaiting response... 302 Found
……………………………………..                                                                                                                                                        ] 658,124     27.9KB/s   in 12s

2020-12-24 04:37:03 (53.2 KB/s) - ‘v2.0.6.tar.gz’ saved [658124]

[root@ai_bk www]# ll
total 23700
-rw-r--r--  1 root   root      14742 Dec 24  2020 ai_bk_20201224.sql
drwxr-xr-x  2 root   root          6 Nov 16 11:19 cgi-bin
-rw-r--r--  1 root   root   20487388 Dec 24  2020 emqx-centos7-v3.2.3.x86_64.rpm
drwxr-xr-x  7 apache apache     4096 Dec 24  2020 html
drwxr-xr-x 11 root   root       4096 Dec 24 04:29 librdkafka-master
-rw-r--r--  1 root   root    3012324 Dec 24 04:24 librdkafka-master.zip
drwxr-xr-x  2 apache apache      123 Dec 24 04:21 logs
drwxr-xr-x 11 root   root       4096 Dec 24 04:31 php-rdkafka-master
-rw-r--r--  1 root   root      76177 Dec 24 04:29 php-rdkafka-master.zip
-rw-r--r--  1 root   root     658124 Dec 24 04:37 v2.0.6.tar.gz
[root@ai_bk www]#
5.2 安装
5.2.1 解压缩
[root@ai_bk www]# tar zxvf v2.0.6.tar.gz
[root@ai_bk www]# tar zxvf v2.0.6.tar.gz
swoole-src-2.0.6/
swoole-src-2.0.6/.gitignore
swoole-src-2.0.6/.gitmodules
swoole-src-2.0.6/.travis.yml
swoole-src-2.0.6/CMakeLists.txt
………………………………..

[root@ai_bk www]# ll
total 23704
-rw-r--r--  1 root   root      14742 Dec 24  2020 ai_bk_20201224.sql
drwxr-xr-x  2 root   root          6 Nov 16 11:19 cgi-bin
-rw-r--r--  1 root   root   20487388 Dec 24  2020 emqx-centos7-v3.2.3.x86_64.rpm
drwxr-xr-x  7 apache apache     4096 Dec 24  2020 html
drwxr-xr-x 11 root   root       4096 Dec 24 04:29 librdkafka-master
-rw-r--r--  1 root   root    3012324 Dec 24 04:24 librdkafka-master.zip
drwxr-xr-x  2 apache apache      123 Dec 24 04:21 logs
drwxr-xr-x 11 root   root       4096 Dec 24 04:31 php-rdkafka-master
-rw-r--r--  1 root   root      76177 Dec 24 04:29 php-rdkafka-master.zip
drwxrwxr-x 11 root   root       4096 Jan 26  2017 swoole-src-2.0.6
-rw-r--r--  1 root   root     658124 Dec 24 04:37 v2.0.6.tar.gz
进入解压缩目录
[root@ai_bk www]# cd swoole-src-2.0.6/
[root@ai_bk www]# cd swoole-src-2.0.6/
[root@ai_bk swoole-src-2.0.6]# ll
total 1068
drwxrwxr-x  2 root root    293 Jan 26  2017 benchmark
-rw-rw-r--  1 root root   1844 Jan 26  2017 CMakeLists.txt
-rwxrwxr-x  1 root root  12656 Jan 26  2017 config.m4
-rw-rw-r--  1 root root     62 Jan 26  2017 CREDITS
drwxrwxr-x 31 root root   4096 Jan 26  2017 examples
……………
5.2.2 生成Makefile
检查并生成configure文件
[root@ai_bk swoole-src-2.0.6]# phpize
[root@ai_bk swoole-src-2.0.6]# phpize
Configuring for:
PHP Api Version:         20160303
Zend Module Api No:      20160303
Zend Extension Api No:   320160303
生成Makefile文件
[root@ai_bk swoole-src-2.0.6]# ./configure –with-php-config=/usr/bin/php-config
[root@ai_bk swoole-src-2.0.6]# ./configure --with-php-config=/usr/bin/php-config
checking for grep that handles long lines and -e... /usr/bin/grep
checking for egrep... /usr/bin/grep -E
checking for a sed that does not truncate output... /usr/bin/sed
checking for cc... cc
…………………………………..
5.2.3 编译、安装
[root@ai_bk swoole-src-2.0.6]# make && make install
[root@ai_bk swoole-src-2.0.6]# make && make install
/bin/sh /var/www/swoole-src-2.0.6/libtool --mode=compile cc  -I. -I/var/www/swoole-src-2.0.6 -DPHP_ATOM_INC -I/var/www/swoole-src-2.0.6/include -I/var/www/swoole-src-2.0.6/main -I/var/www/swoole-src-2.0.6 -I/usr/include/php -I/usr/include/php/main -I/usr/include/php/TSRM -I/usr/include/php/Zend -I/usr/include/php/ext -I/usr/include/php/ext/date/lib -I/var/www/swoole-src-2.0.6 -I/var/www/swoole-src-2.0.6/include  -DHAVE_CONFIG_H  -Wall -pthread -g -O2   -c /var/www/swoole-src-2.0.6/swoole.c -o swoole.lo
5.3 配置
查找swoole.so文件位置
[root@ai_bk swoole-src-2.0.6]# find / -name swoole.so
[root@ai_bk swoole-src-2.0.6]# find / -name swoole.so
/var/www/swoole-src-2.0.6/modules/swoole.so
/var/www/swoole-src-2.0.6/.libs/swoole.so
/usr/lib64/php/modules/swoole.so

[root@ai_bk swoole-src-2.0.6]# cd /etc/php.d
[root@ai_bk php.d]# ll
total 148
-rw-r--r-- 1 root root   47 Oct 26  2019 bz2.ini
-rw-r--r-- 1 root root   57 Oct 26  2019 calendar.ini
-rw-r--r-- 1 root root   51 Oct 26  2019 ctype.ini
-rw-r--r-- 1 root root   49 Oct 26  2019 curl.ini
-rw-r--r-- 1 root root   47 Oct 26  2019 dom.ini
-rw-r--r-- 1 root root   49 Oct 26  2019 exif.ini
-rw-r--r-- 1 root root   57 Oct 26  2019 fileinfo.ini
-rw-r--r-- 1 root root   47 Oct 26  2019 ftp.ini
…………………………………………..
[root@ai_bk php.d]#
新建文件,并添加
[root@ai_bk php.d]# vi swoole.ini
[root@ai_bk php.d]# cat swoole.ini
[root@ai_bk php.d]# vi swoole.ini
[root@ai_bk php.d]# cat swoole.ini
extension=swoole.so
[root@ai_bk php.d]#
重启
[root@ai_bk php.d]# systemctl restart php-fpm
[root@ai_bk php.d]# systemctl restart httpd
5.4 验证
[root@ai_bk php.d]# php -m | grep swoole
[root@ai_bk php.d]# php -m | grep swoole
swoole
6 其他设置
6.1 防火墙设置(部分情况下存在)
[root@ai_bk emqx]# iptables -t nat –list
[root@ai_bk emqx]# iptables -t nat --list
Chain PREROUTING (policy ACCEPT)
target     prot opt source               destination

Chain INPUT (policy ACCEPT)
target     prot opt source               destination

Chain OUTPUT (policy ACCEPT)
target     prot opt source               destination

Chain POSTROUTING (policy ACCEPT)
target     prot opt source               destination
[root@ai_bk emqx]#
如果存在,就删除MASQUERADE all — anywhere anywhere
[root@ai_bk emqx]# iptables -t nat -D POSTROUTING 16.2 FTP安装(开发使用)
开发工具PSPAD使用
6.2.1 安装
[root@ai_bk emqx]# rpm -qa | grep vsftpd
[root@ai_bk emqx]# yum -y install vsftpd
[root@ai_bk emqx]# rpm -qa | grep vsftpd
[root@ai_bk emqx]# yum -y install vsftpd
Loaded plugins: fastestmirror
Loading mirror speeds from cached hostfile
 * base: mirrors.bfsu.edu.cn
 * epel: mirrors.tuna.tsinghua.edu.cn
 * extras: mirrors.bfsu.edu.cn
……………………………………….
Warning: RPMDB altered outside of yum.
  Installing : vsftpd-3.0.2-28.el7.x86_64                                                                                                   1/1
  Verifying  : vsftpd-3.0.2-28.el7.x86_64                                                                                                   1/1

Installed:
  vsftpd.x86_64 0:3.0.2-28.el7

Complete!
[root@ai_bk emqx]#
6.2.2 配置
关闭匿名访问
[root@ai_bk emqx]# vi /etc/vsftpd/vsftpd.conf
12 anonymous_enable=NO设置允许root远程登录
删除root
[root@ai_bk vsftpd]# vi /etc/vsftpd/user_list
[root@ai_bk vsftpd]# cat /etc/vsftpd/user_list
[root@ai_bk vsftpd]# vi /etc/vsftpd/user_list
[root@ai_bk vsftpd]# cat /etc/vsftpd/user_list
# vsftpd userlist
# If userlist_deny=NO, only allow users in this file
# If userlist_deny=YES (default), never allow users in this file, and
# do not even prompt for a password.
# Note that the default vsftpd pam config also checks /etc/vsftpd/ftpusers
# for users that are denied.
bin
daemon
adm
lp
sync
shutdown
halt
mail
news
uucp
operator
games
nobody
[root@ai_bk vsftpd]#
删除root
[root@ai_bk vsftpd]# vi /etc/vsftpd/ftpusers
[root@ai_bk vsftpd]# cat /etc/vsftpd/ftpusers
[root@ai_bk vsftpd]# vi /etc/vsftpd/ftpusers
[root@ai_bk vsftpd]# cat /etc/vsftpd/ftpusers
# Users that are not allowed to login via ftp
bin
daemon
adm
lp
sync
shutdown
halt
mail
news
uucp
operator
games
nobody
[root@ai_bk vsftpd]#
配置成主动模式(华为服务器需要,腾讯云服务器跳过)
[root@ai_bk vsftpd]# vi /etc/vsftpd/vsftpd.conf
    43	pasv_enable=NO
    44	port_enable=YES
    45	connect_from_port_20=YES
6.2.3 启动、自启动
[root@ai_bk ~]# systemctl status vsftpd
● vsftpd.service - Vsftpd ftp daemon
   Loaded: loaded (/usr/lib/systemd/system/vsftpd.service; enabled; vendor preset: disabled)
   Active: active (running) since Thu 2020-12-24 19:34:52 EST; 11s ago
 Main PID: 2380 (vsftpd)
   CGroup: /system.slice/vsftpd.service
           └─2380 /usr/sbin/vsftpd /etc/vsftpd/vsftpd.conf

Dec 24 19:34:52 ai_bk systemd[1]: Starting Vsftpd ftp daemon...
Dec 24 19:34:52 ai_bk systemd[1]: Started Vsftpd ftp daemon.
[root@ai_bk vsftpd]# systemctl restart vsftpd
[root@ai_bk vsftpd]# systemctl enable vsftpd
6.3 定时任务
需要在apache账号下执行:
6.3.1 获得源任务
利用crontab -l从源服务器上拷贝下来:
*/1 * * * * /usr/bin/php  /var/www/html/api/timing/oper_pack_timeout.php
50 4 * * * /usr/bin/php  /var/www/html/api/timing/oper_del_dev_status_report.php
*/10 * * * * /usr/bin/php  /var/www/html/api/timing/oper_server_status_abnormal.php
00 8 * * * /usr/bin/php  /var/www/html/api/timing/oper_server_status_normal.php
00 8 * * * /usr/bin/php  /var/www/html/api/timing/oper_del_sys_email.php
*/1 * * * * /usr/bin/php  /var/www/html/api/timing/oper_upload_images.php
6.3.2 设置新任务
在新安装服务器上,粘贴:
[apache @ai_bk vsftpd]# crontab –e
[apache@ai_bk logs]$ crontab -l
[apache @ai_bk vsftpd]# crontab –e
[apache@ai_bk logs]$ crontab -l
*/1 * * * * /usr/bin/php  /var/www/html/api/timing/oper_pack_timeout.php
50 4 * * * /usr/bin/php  /var/www/html/api/timing/oper_del_dev_status_report.php
*/10 * * * * /usr/bin/php  /var/www/html/api/timing/oper_server_status_abnormal.php
00 8 * * * /usr/bin/php  /var/www/html/api/timing/oper_server_status_normal.php
00 8 * * * /usr/bin/php  /var/www/html/api/timing/oper_del_sys_email.php
*/1 * * * * /usr/bin/php  /var/www/html/api/timing/oper_upload_images.php
6.3.3 启动、自启动
[apache @ai_bk html]# systemctl restart crond
[apache@ai_bk logs]$ systemctl enable crond
==== AUTHENTICATING FOR org.freedesktop.systemd1.reload-daemon ===
Authentication is required to reload the systemd state.
Authenticating as: root
Password:
==== AUTHENTICATION COMPLETE ===
[apache@ai_bk logs]$
6.4 导入代码
6.4.1 拷贝
将整个HTML下目录代码拷贝到/var/www/html目录下
6.4.2 导入
[root@ai_bk html]# ll /var/www/html/
[root@ai_bk html]# ll /var/www/html/
total 304
drwxr-xr-x 12 root root  206 Dec 24 17:08 api
drwxr-xr-x  2 root root   42 Dec 24 17:08 css
-rw-r--r--  1 root root 4488 Dec 24 17:08 dev_location.html
…………………………………
-rw-r--r--  1 root root 1148 Dec 24 17:08 version_mgr_ws_del.php
[root@ai_bk html]#
6.4.3 修改属性
[root@ai_bk www]# chown -R apache:apache html
[root@ai_bk www]# chown -R apache:apache html
[root@ai_bk www]# ll /html
ls: cannot access /html: No such file or directory

[root@ai_bk www]# ll /var/www/html/
total 304
drwxr-xr-x 12 apache apache  206 Dec 24 17:08 api
drwxr-xr-x  2 apache apache   42 Dec 24 17:08 css
-rw-r--r--  1 apache apache 4488 Dec 24 17:08 dev_location.html
-rw-r--r--  1 apache apache 4368 Dec 24 17:08 dev_location.js
-rw-r--r--  1 apache apache 1212 Dec 24 17:08 dev_location_ws_add.php
……………………………………….
-rw-r--r--  1 apache apache 1148 Dec 24 17:08 version_mgr_ws_del.php
[root@ai_bk www]#
6.5 自启动rc.local
6.5.1 准备自启动脚本
[root@ai_bk api]# ll /var/www/html/api/
[root@ai_bk api]# ll /var/www/html/api/
total 24
…………………….
-rw-r--r-- 1 apache apache  391 Dec 24 17:08 service_self_startup.sh
………………………..
[apache@ai_bk api]$ cat service_self_startup.sh
[apache@ai_bk api]$ cat service_self_startup.sh
#!/bin/sh

# chkconfig: 2345 20 90
#服务必须在运行级2,3,4,5下被启动或关闭,启动的优先级是90,关闭的优先级是10。
# description: Start and Stop mqtt

##set ff=unix

sleep 20
nohup /usr/bin/php /var/www/html/api/mqtt/mqtt_startup_service.php >/dev/null 2>&1 &


nohup /usr/bin/php /var/www/html/api/swoole/swoole_startup_udp_server.php >/dev/null 2>&1 &
[apache@ai_bk api]$
6.5.2 拷贝
将自启动脚本拷贝到自启动目录
[root@ai_bk api]# cp /var/www/html/api/mqtt_self_startup.sh /etc/rc.d/init.d/
[root@ai_bk api]# cp /var/www/html/api/mqtt_self_startup.sh /etc/rc.d/init.d/

[root@ai_bk api]# ll /etc/rc.d/init.d/
total 48
-rw-r--r--. 1 root root 18104 Jan  2  2018 functions
-rwxr-xr-x. 1 root root  4334 Jan  2  2018 netconsole
-rwxr-xr-x. 1 root root  7293 Jan  2  2018 network
-rw-r--r--. 1 root root  1160 Apr 11  2018 README
-rw-r--r--  1 root root   391 Dec 24 17:13 service_self_startup.sh
6.5.3 修改属性为可运行
[root@ai_bk api]# cd /etc/rc.d/init.d
[root@ai_bk init.d]# chmod 755 mqtt_self_startup.sh
[root@ai_bk api]# cd /etc/rc.d/init.d
[root@ai_bk init.d]# chmod 755 mqtt_self_startup.sh
[root@ai_bk init.d]# ll
total 48
-rw-r--r--. 1 root root 18104 Jan  2  2018 functions
-rwxr-xr-x. 1 root root  4334 Jan  2  2018 netconsole
-rwxr-xr-x. 1 root root  7293 Jan  2  2018 network
-rw-r--r--. 1 root root  1160 Apr 11  2018 README
-rwxr-xr-x  1 root root   391 Dec 24 17:13 service_self_startup.sh
6.5.4 编辑rc.local
在rc.local添加:/bin/su – pyrk -c “/etc/rc.d/init.d/mqtt_self_startup.sh”
[root@ai_bk init.d]# vi /etc/rc.d/rc.local
[root@ai_bk init.d]# cat /etc/rc.d/rc.local
[root@ai_bk init.d]# chmod +x /etc/rc.d/rc.local
[root@ai_bk init.d]# vi /etc/rc.d/rc.local
[root@ai_bk init.d]# cat /etc/rc.d/rc.local
#!/bin/bash
# THIS FILE IS ADDED FOR COMPATIBILITY PURPOSES
#
# It is highly advisable to create own systemd services or udev rules
# to run scripts during boot instead of using this file.
#
# In contrast to previous versions due to parallel execution during boot
# this script will NOT be run after all other services.
#
# Please note that you must run 'chmod +x /etc/rc.d/rc.local' to ensure
# that this script will be executed during boot.

touch /var/lock/subsys/local

/bin/su - pyrk -c "/etc/rc.d/init.d/mqtt_self_startup.sh"
基于组件服务需要先于程序启动,有时候需要再/BIN/SU之前加SLEEP 120,时间延迟
6.5.5 重启、自启动
[root@ai_bk init.d]# systemctl start rc-local
[root@ai_bk init.d]# systemctl enable rc-local
6.6 定时NTP
6.6.1 安装
[root@ai_bk init.d]# yum -y install ntp ntpdate
[root@ai_bk init.d]# yum -y install ntp ntpdate
Loaded plugins: fastestmirror
Loading mirror speeds from cached hostfile
 * base: mirrors.bfsu.edu.cn
 * epel: ftp.iij.ad.jp
 * extras: mirrors.bfsu.edu.cn
 * updates: mirrors.bfsu.edu.cn
 * webtatic: us-east.repo.webtatic.com
Resolving Dependencies
…………………………………….
Installed:
  ntp.x86_64 0:4.2.6p5-29.el7.centos.2                                 ntpdate.x86_64 0:4.2.6p5-29.el7.centos.2

Dependency Installed:
  autogen-libopts.x86_64 0:5.18-5.el7

Complete!
[root@ai_bk init.d]#
6.6.2 启动服务
[root@ai_bk init.d]# systemctl start ntpd
[root@ai_bk init.d]# systemctl enable ntpd
Created symlink from /etc/systemd/system/multi-user.target.wants/ntpd.service to /usr/lib/systemd/system/ntpd.service.
[root@ai_bk vsftpd]#
6.6.3 定时
[root@ai_bk init.d]# ntpdate -u -s ntp2.aliyun.com ntp3.aliyun.com ntp4.aliyun.com ntp5.aliyun.com ntp6.aliyun.com ntp7.aliyun.com
[root@ai_bk init.d]# systemctl restart ntpd
[root@ai_bk init.d]# ntpdate -u -s ntp2.aliyun.com ntp3.aliyun.com ntp4.aliyun.com ntp5.aliyun.com ntp6.aliyun.com ntp7.aliyun.com
[root@ai_bk init.d]# systemctl restart ntpd
6.6.4 查看
[root@ai_bk init.d]# timedatectl
[root@ai_bk init.d]# timedatectl
      Local time: Thu 2020-12-24 04:20:41 EST
  Universal time: Thu 2020-12-24 09:20:41 UTC
        RTC time: Thu 2020-12-24 22:20:39
       Time zone: America/Toronto (EST, -0500)
     NTP enabled: no
NTP synchronized: no
 RTC in local TZ: no
      DST active: no
 Last DST change: DST ended at
                  Sun 2020-11-01 01:59:59 EDT
                  Sun 2020-11-01 01:00:00 EST
 Next DST change: DST begins (the clock jumps one hour forward) at
                  Sun 2021-03-14 01:59:59 EST
                  Sun 2021-03-14 03:00:00 EDT
[root@ai_bk init.d]#
6.6.5 定时
crontab -e0 */1 * * * /usr/sbin/ntpdate -u -s ntp2.aliyun.com ntp3.aliyun.com ntp4.aliyun.com ntp5.aliyun.com ntp6.aliyun.com ntp7.aliyun.com6.7 EMQ监听
EMQ需要的端口
//emq访问 1883 8883
//emq dashboard 18083 11883 8083 8084 8080
//emq cluster 4369 6369 5369
//mysql 3306
//web 5888
6.7.1 获取AppID和AppSecret
访问EMQX的DASHBOARD

集群需要每个单独建设


6.7.2 监听
Server_status_check.php中替换checkEmqxStatus函数
AppID:AppSecret
如:83569de8e5bd9:MjkwODIxOTkxMzQxMzg3MjA5MDY5MjEzNTI4NTI5MzA1NjA
6.7.2.1 单节点
无需替换
    private function checkEmqxStatus(){
		try {
			//需要在DASHBOARD的Application下添加App
			$cmd = 'curl -v --basic -u cec7892c65b8e:Mjk2NzgwNDY2OTI2Mzg1OTAxMjE3MjM2NDcwMTkzODQ4MzC -k http://127.0.0.1:8080/api/v3/brokers/';
			$ret = shell_exec($cmd);
			//var_dump($ret);
			if (!(strpos($ret,'Running') && strpos($ret,'127.0.0.1') )) {
				return false;
			}

			return true;
		} catch (Exception $e) {
			Log::info("ServerStatusCheck::checkEmqxStatus Exception: " . $e->getMessage(), Log::EXCEPT);
			return false;
		}
    }
6.7.2.2 集群
替换IP地址即可
    private function checkEmqxStatus(){
		try {
			//需要在DASHBOARD的Application下添加App
			$cmd = 'curl -v --basic -u 83569de8e5bd9:MjkwODIxOTkxMzQxMzg3MjA5MDY5MjEzNTI4NTI5MzA1NjA -k http://62.234.188.57:8080/api/v3/brokers/';
			$ret = shell_exec($cmd);
			//var_dump($ret);
			if (!(strpos($ret,'Running') && strpos($ret,'62.234.192.50') && strpos($ret,'62.234.188.57'))) {
				return false;
			}

			$cmd = 'curl -v --basic -u 83569de8e5bd9:MjkwODIxOTkxMzQxMzg3MjA5MDY5MjEzNTI4NTI5MzA1NjA -k http://62.234.192.50:8080/api/v3/brokers/';
			$ret = shell_exec($cmd);
			//var_dump($ret);
			if (!(strpos($ret,'Running') && strpos($ret,'62.234.192.50') && strpos($ret,'62.234.188.57'))) {
				return false;
			}

			return true;
		} catch (Exception $e) {
			Log::info("ServerStatusCheck::checkEmqxStatus Exception: " . $e->getMessage(), Log::EXCEPT);
			return false;
		}
    }
6.8 邮箱
6.8.1 获取授权码


6.8.2 使用
开启后,收到授权码,在配置文件中替换Config::getMailPasswd()
替换邮箱账号:Config::getMailAccount()
7 使用说明
7.1 func.js
替换IP地址,如果用域名,则替换域名
func.js中function getURL() {
    return "http://192.168.0.100:5888/";
    //return "http://ibc.wisdomct.cn:5888/";
}
7.2 EMQ集群监听
ServerStatusCheck: checkEmqxStatus函数
单节点不用修改;
集群时,依次添加即可。
7.3 com_config
分为测试环境和正式环境,如果都是部署的本地,生成环境也可以配置成测试模式。
只有生产环境是集群是,在集群上运行才需要设置成集群模式。
才需要对对应修改生产地址
7.4 重启软件
重启:service_restart.sh
sleep 1
echo "stop mqtt service"
ps -ef|grep mqtt_startup_service|grep -v grep|awk  '{print "kill -9 " $2}' |sh
echo "start mqtt service"
nohup /usr/bin/php /var/www/html/api/mqtt/mqtt_startup_service.php >/dev/null 2>&1 &

sleep 1
echo "stop swoole service"
ps -ef|grep swoole_startup_udp_server|grep -v grep|awk  '{print "kill -9 " $2}' |sh
echo "start swoole service"
nohup /usr/bin/php /var/www/html/api/swoole/swoole_startup_udp_server.php >/dev/null 2>&1 &
7.5 日志备份
针对集群正产环境文件在/log中
zip -r /log/backup/2020-10.zip /log/aibk/info.log.2020-10-*
rm -f /log/aibk/info.log.2020-10-*
7.6 备份数据
导出整个数据库结构和数据
mysqldump -h localhost -uroot -p***** ai_bk > ai_bk_20190713.sql导出整个数据库结构(不包含数据)
mysqldump -h localhost -uroot -p***** -d ai_bk > ai_bk_20201101.sql导入
mysql -uroot -h localhost -p***** < ai_bk_20190713.sql8 docker|docker-compose环境使用
https://docs.docker.com/engine/install/centos/yum remove docker docker-client docker-client-latest docker-common docker-latest docker-latest-logrotate docker-logrotate docker-engine
yum install -y yum-utils
yum-config-manager --add-repo https://download.docker.com/linux/centos/docker-ce.repo
yum install docker-ce docker-ce-cli containerd.io docker-compose-plugin
systemctl start docker
systemctl enable docker
curl -L "https://github.com/docker/compose/releases/download/1.28.6/docker-compose-$(uname -s)-$(uname -m)" -o /usr/local/bin/docker-compose
chmod +x /usr/local/bin/docker-compose
docker-compose up -d --build