简介:
WordPress网站迁移安装环境及版本:
系统环境:CentOS Linux release 7.5.1804 (Core)
WordPress版本:wordpress-5.4.2.tar.gz
一、前提条件
新系统安装和原系统一样的环境,比如原系统是LAMP,新系统也安装LAMP。
二、迁移步骤
2.1 发布目录
将原系统发布目录整个文件夹下载下来,上传到新系统发布目录
2.2 数据库迁移
2.2.1 导出数据
导出源系统数据库到文件wp20200702.sql,并将文件下载下来
mysqldump -uchpdirector -p chp_db>wp20200702.sql
[apache@chpdirector www]$ mysqldump -uchpdirector -p chp_db>wp20200702.sql
Enter password:
[apache@chpdirector www]$ ll
total 428
drwxrwxrwx. 2 root root 6 Apr 2 09:14 cgi-bin
drwxrwxrwx. 6 apache apache 4096 Jun 30 01:49 html
drwxrwxrwx. 2 apache apache 6 Jun 29 02:51 logs
-rw-r--r-- 1 apache apache 431761 Jul 1 19:18 wp20200702.sql
2.2.2 导入数据
在新系统建一个和源系统一样名字的数据库:create database chp_db
[root@bkcase ~]# mysql -uchpdirector -p
Enter password:
Welcome to the MariaDB monitor.  Commands end with ; or \g.
Your MariaDB connection id is 8243
Server version: 5.5.65-MariaDB MariaDB Server

Copyright (c) 2000, 2018, Oracle, MariaDB Corporation Ab and others.

Type 'help;' or '\h' for help. Type '\c' to clear the current input statement.

MariaDB [(none)]> create database chp_db;
Query OK, 1 row affected (0.00 sec)

MariaDB [(none)]> flush privileges;
Query OK, 0 rows affected (0.00 sec)

MariaDB [(none)]> exit;
Bye将文件wp20200702.sql上传到新系统并导入:mysql -uchpdirector -p chp_db < /home/chpdirector/wp20200702.sql
[root@bkcase ~]# mysql -uchpdirector -p chp_db1</home/chpdirector/wp20200702.sql
Enter password:
如果数据用户名和密码修改了,需要修改WP的wp-config.php文件
2.3 URL地址调整
2.3.1 修改站点IP地址
可通过页面修改,也可以直接修改数据库
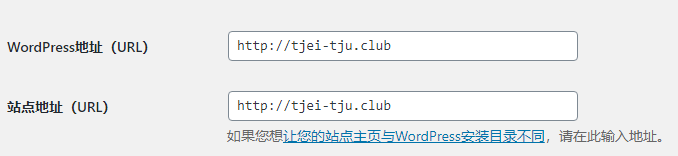
2.3.1.1 页面修改
右边设置->常规:
2.3.1.2 数据库修改(可选)
更新IP地址:
update chp_options set option_value="http://139.9.247.54" WHERE option_name="siteurl"更新IP地址:
update chp_options set option_value="http://139.9.247.54" WHERE option_name="home";[root@bkcase ~]# mysql -uchpdirector -p
Enter password:
Welcome to the MariaDB monitor. Commands end with ; or \g.
Your MariaDB connection id is 8267
Server version: 5.5.65-MariaDB MariaDB Server
Copyright (c) 2000, 2018, Oracle, MariaDB Corporation Ab and others.
Type 'help;' or '\h' for help. Type '\c' to clear the current input statement.
MariaDB [(none)]> use chp_db;
Reading table information for completion of table and column names
You can turn off this feature to get a quicker startup with -A
Database changed
MariaDB [chp_db1]> update chp_options set option_value="http://139.9.247.54" WHERE option_name="siteurl";
Query OK, 1 row affected (0.01 sec)
Rows matched: 1 Changed: 1 Warnings: 0
MariaDB [chp_db1]> update chp_options set option_value="http://139.9.247.54" WHERE option_name="home";
Query OK, 1 row affected (0.00 sec)
Rows matched: 1 Changed: 1 Warnings: 0
MariaDB [chp_db1]> flush privileges;
Query OK, 0 rows affected (0.00 sec)
MariaDB [chp_db1]> exit;
Bye2.3.2 更新首页链接(可选)
右边选择外观->菜单,打开首页配置,更新首页带单的URL,并点击保存菜单

固定链接:/index.php/%year%/%monthnum%/%day%/%postname%/
2.3.3 更新用户信息站点(可选)
右边菜单选择用户,再点击需要修改的用户
三、主题更新
3.1 ycoto主题
3.1.1 去除页脚主题作者、版权
去掉/var/www/html/wp-content/themes/yocto/footer.php文件下的:
<?php get_template_part( 'template-parts/footer/site', 'info' ); ?>3.1.2 不替换
该文件不能替换,否则报错
/var/www/html/wp-content/themes/yocto/header.php
四、验证
浏览器输入:http://tjei-tju.club/wp-login.php

五、安全防护
5.1 恶意攻击:CPU过高宕机
wordpress网站xmlrpc.php文件是一个远程端口文件,攻击者通过POST提交恶意大量的提交,不断的访问xmlrpc.php文件,形成DDOS攻击,致使网站服务器CPU过高停机,网站无法打开。
解决wordpress网站xmlrpc.php文件被恶意攻击,特别好的方法就是关闭掉自己网站xmlrpc.php文件。
第一步:在自己网站使用的wordpress模板中找到模板函数文件functions.php,当下面的代码粘贴进去。
add_filter('xmlrpc_enabled', '__return_false');第二步:再通过.htaccess屏蔽xmlrpc.php文件的访问,这个文件是放在网站空间的根目录下。
<Files xmlrpc.php>
Order Deny,Allow
Deny from all
</Files>
六、WP升级
在wp-config.php文件末尾添加:
define("FS_METHOD","direct");
define("FS_CHMOD_DIR", 0777);
define("FS_CHMOD_FILE", 0777);
同时修改/var/www/htm/权限为777,升级完成后改为555